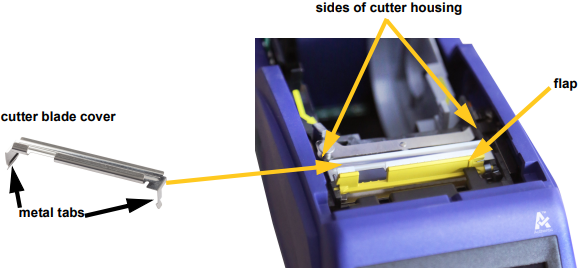
M611 Cutter Assembly ReplacementThis information can also be found in the user manual: M611 - User Manual and Quick Start Guide or M611 Label Printer - User Manual & Quick Start Guide (Authentic).Remove the Cutter Blade Cover
WARNING: Turn off the printer before replacing the cutter blade cover.

- From inside the supply well, slip your finger under the right side of the blade cover and gently pull up to unhook the blade cover. The blade cover releases easily.
Re-insert the Cutter Blade
- Grasp the blade cover from the top with the cut-out portion of the blade facing the display screen (away from the supply well).
- Pull the yellow flap forward, then insert the blade tight up against the yellow flap with the metal tabs fitting over the outside of the cutter housing. The blade cover snaps in easily.
Replacing the Cutter AssemblyCAUTION: Handle the plastic housing on the cutter assembly carefully. Do not insert fingers near the cutter as it could pinch or cut.
- Remove the cutter blade cover with the above steps.
- Turn the printer on and select Settings.
M611 Label Printer
Note: The M611 Label Printer has the Authentic A above the right side of the LCD screen. View the BradyPrinter M611 instructions below.
- Select Maintenance Help.
- Select Part Replacement.
- Select Cutter. This moves the cutter into position for service, uncovering the mounting screw.
Proceed to step 6.
BradyPrinter M611
- Tap Maintenance.
- Select Replace Cutter. This moves the cutter into position for service, uncovering the mounting screw.
Proceed to step 6.
Replace Cutter
- Loosen the mounting screw.
- Remove the cutter assembly.
- Install the new cutter assembly making sure the two tabs are located as indicated in the picture below, and the lever is between the bearing and pin on the actuator as shown in the picture above.
- Tighten the mounting screw.
- Tap Done on the touch screen to return the cutter to its home position.
Related information


