The i7500 can print double sided sleeves on the standard configuration or auto cut configuration printers only.
Printer suggestions:
- Use the heavy-duty guillotine auto cutter with auto cutter print mode to effectively cut the permasleeve labels.
- Use a serrated tear bar with the tear-off print mode can be done, but it is not recommended and may tear unevenly.
- It is not suggested to print permasleeves that are a manual label roll where the printer does not have the RFID chip.
The printer can print both sides of double-sided sleeves without wasting any leading sleeves. When printing double-sided sleeves, print side one directly from the roll. To print side two, cut or tear the label supply at the end of the job, then load the printed strip of sleeves into the back of the printer for the second print pass.
Note: When printing double-sided sleeves, the total length of the strip printed must meet or exceed 5 inches (127mm) in order for the end of the strip of labels to cover the optical sensor and initiate printing.
Note: When printing on black double-sided sleeves, the printer will advance the labels leaving the first one blank. Do not remove this sleeve. When installing the strip to print the second side, feed the leading edge of the strip, including the blank sleeve, to the correct location in the middle of the black rubber platen roller; the blank sleeve will be skipped and printing will begin on the second sleeve.
- Create the label using Brady Workstation.
The printer should automatically cut the permasleeve label if the Auto Cutter feature is set in Settings > Print Adjustments > Print Mode > Current Operating Mode > Auto Cutter.
- After printing slide one, press OK.
- Instructions will display on the screen for side 2. DO NOT press the button before reading the instructions.
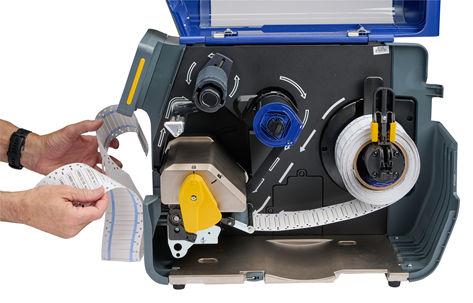
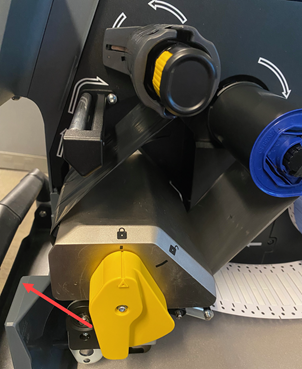
- Open the printhead using the yellow lever but do not remove the roll of sleeves.
- With the label roll in place, spin the roll counter-clockwise pulling the leading edge of the material backward about 12 inches leaving the print path empty.
Important: The label roll must remain in the printer or an error condition will reset.
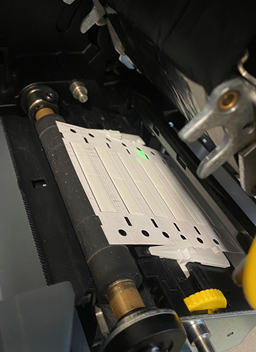
- Insert the leading edge of the printed strip of sleeves blank-side-up into the print path beneath the printhead and between the label guides, as though you were loading new labels. Stop the leading edge when it is in the center of the black rubber platen roller.
Note: To facilitate longer strips of sleeves, the strip can be fed through the slot in the rear of the printer, then fed over the top or behind and under the installed roll of sleeves. The rear gray housing can also be removed to provide additional clearance when feeding in the strip of sleeves.
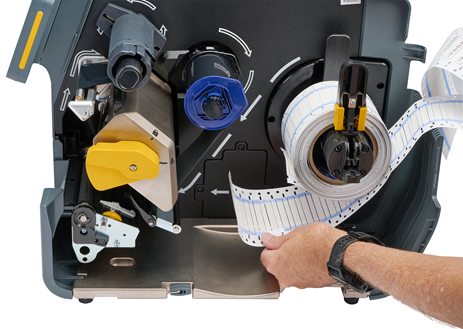
Note: Take care to insert the correct end of the strip for second-side print pass - “first sleeve first.”
- Close the printhead using the yellow lever.
- After the labels move back and forth, touch PRINT SIDE 2 on the printer’s display.
To print double-sided sleeves with the tear bar or serrated tear bar:
- Install the tear bar or serrated tear bar.
- Tap Settings > Print Adjustments > Print Mode > Current Operating Mode and select Tear Off if using the tear bar: i7500 - Adjust Print Mode.
- Print the label.
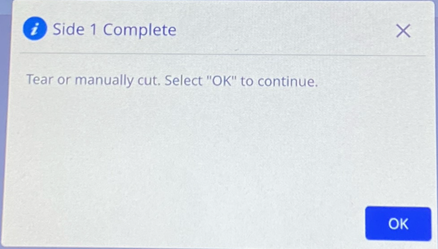
- When side one is done, the message “Side 1 Complete” is displayed.

- Tear or manually cut after the last label.
Note: The edge notch at the leading edge must be cut through the center of the notch. If this was not accomplished using the tear bar, use a scissors to trim straight across.

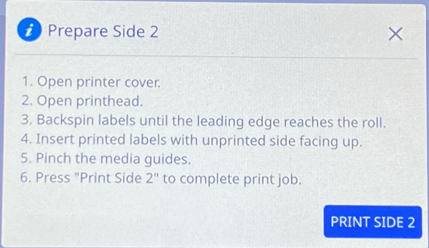
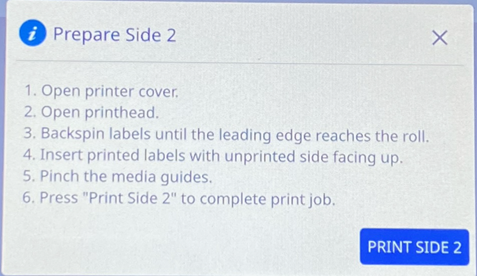
- Select OK to continue. The message “Prepare Side 2” along with a button will be displayed.

- Open the printhead. Push the leading edge of the unprinted supply backward out of the guides and back onto the roll, but do not remove the roll itself. This clears the print path.
Note: The label roll must remain in the printer or an error condition will result.
- Thread the strip of sleeves through the label guides and pull forward so the leading edge sits just past the black rubber roller.
If the strip of sleeves is long, you can thread the trailing end out the slot in the back of the printer.
-
- The leading edge must be the first sleeve in your print sequence.
- The printed side must be facing down.
- Close the cover and tap Print Side 2 on the touchscreen.


