Body | Note: This article covers configuration for the perforation cutter. See this article for configuration of the standard cutter accessory - How to Setup and Install an Auto Cutter on the i7100 Printer
Please see the attached .pdf document that contains information on the Perforation Cutter for the PR Plus and i7100 model printers. While the manual states that it is solely for the PR printer this cutter would also be compatible with the i7100.
If you wish to perforate instead of cut, you may need to make an adjustment to the cutting depth. The perforation cutter can do both and will need fine-tuning based on the materials being cut/perforated. To adjust this follow the instructions below and contact Brady Technical Support if you continue to have issues. Printer Menu Settingsi7100
1.) Tap the Settings Gear on the Ready screen.
2.) Select the Setup Gear icon.
3.) Select Tearing-Off and enable Tear-Off mode (tear off position may need to be fine-tuned).
4.) Go back to Setup and select the Cutter icon.
5.) The default depth is 0 but can range from -20 to 20 and depending on the thickness of material will need to be adjusted to at least -10 for perforating.
BP-PR Plus
1.) Tap the "Menu" key on the printer and then arrow to the right twice to "Setup"
2.) Tap the down arrow (same as "Cancel") to enter the setup menu and then arrow to the right once to "Machine Param"
3.) Tap the down arrow to enter the "Machine Param" menu and arrow over to "Cutter"
4.) Tap the down arrow to enter the "Cutter" menu and then arrow over to "Cutter Depth".
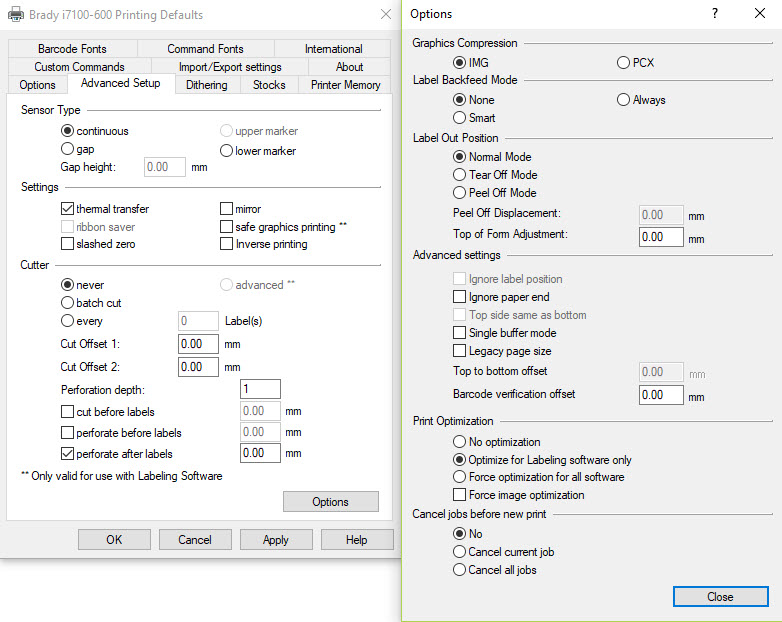
5.) The default depth is 0 but can range from -20 to 20 and depending on the thickness of material will need to be adjusted to at least -10 for perforating.Driver SettingsThe driver must also be set to the correct settings to perforate the labels. Match the settings in the picture below.

|
|
|---|


