If the sensor is not lined up and must be calibrated, run the Sensor calibration for Gap or Black Mark.
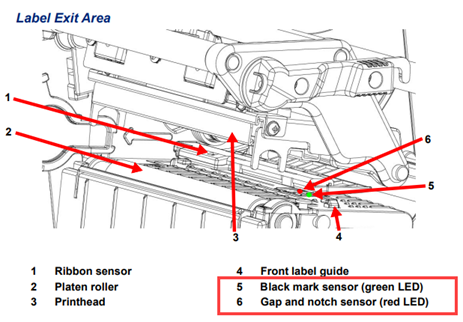
The Red LED is the Gap & Notch Sensor and the Green LED is the Black Mark Sensor.

- Gap Sensor auto calibration mode is used when the printer does not detect a gap on the label supply correctly. Generally a printer is set to detect most types of gap but sometimes it fails to detect the gap and keeps feeding labels when certain non-standard label supplies are used. In such cases, use gap sensor auto calibration to properly detect gaps.
- Black Mark sensor auto calibration mode is used when the printer does not detect a black mark on the label supply correctly. Generally a printer is set to detect most types of black mark but sometimes it fails to detect the mark and keeps feeding labels when certain non-standard label supplies are used. In such cases, use black mark sensor auto calibration to properly detect black marks.
- Use Black Mark for Permasleeve materials.
- Load the labels and ribbon: i6100 - Load Labels and Ribbon.
- Use the navigational arrows to highlight Sensor.
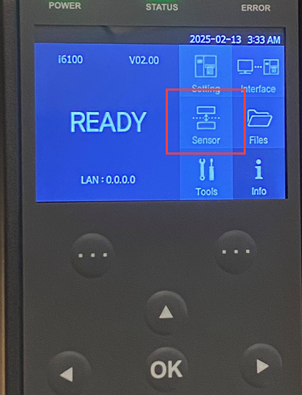
- Press OK to select Sensor.
- Use the navigational arrows to highlight Gap Calibration or Black Mark Calibration.
Note: Use Black Mark for Permasleeve labels.
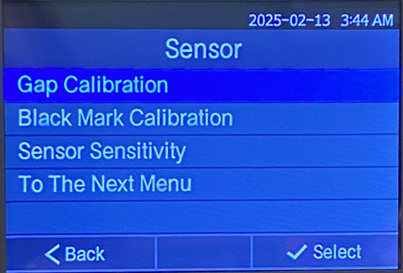
- Press OK to select the calibration.
Both Gap Calibration and Black Mark Calibration will feed a label out.
The calibration cannot be ran again unless the printhead is opened and closed.
- Once the calibration is complete, press the back button to return to the main menu.
If the calibration does not run or there are any other issues, contact Global Brady Technical Support (Contact Information) and provide the serial number (i6100 - Serial Number Location) and the label part number (What Is The Label/Ribbon Part Number and Lot Number?).

