Symptoms
- The printer does nothing when you click print.
- Info is not being transferred from the PC to the printer.
- The software is not recognizing the printer.
Causes
Printer communication issues are almost always caused by one or more misconfigurations in three areas: the printer, driver, and/or the software. While it is often tempting to begin troubleshooting by making changes to the driver and software, the printer is the first component you should check. If your printer is not powered on, loaded correctly, or is in an error state, there is no software or driver setting that will resolve the issue.
Troubleshooting
Try This First:
1. Close the Software
2. Remove the PC connection to the printer
3. Power the Printer Off
4. Launch the Software
5. Power the Printer On
6. Connect the Printer to the PC
I. The Printer
Check First:
- The printer will not print in an error state. Check the printer screen for error messages. You can use this Knowledge Base or your user manual to find information about a specific error message.
- Confirm the printer is loaded correctly. Consult your user manual or this Knowledge Base.
- The printer is powered on, and has not entered into a sleep mode.
Attempt to print a config/test page from the printer display
Most Brady printer models provide a standalone method to print a test or configuration label. If you’re able to print a config/test page with printed text on the labels, then the following must be true:
- The printer is loaded correctly (although not necessarily calibrated).
- The printer is not in an error state.
- The printer is powered on.
If you are still unable to print from your software, then proceed to troubleshoot the physical Printer-PC connection.
II. The USB Connection
Check First:
Confirm the PC detects some device is being connected
1. Open Device Manager, disconnect the USB connection between the PC and printer.
2. Go to Action > Scan for hardware changes.
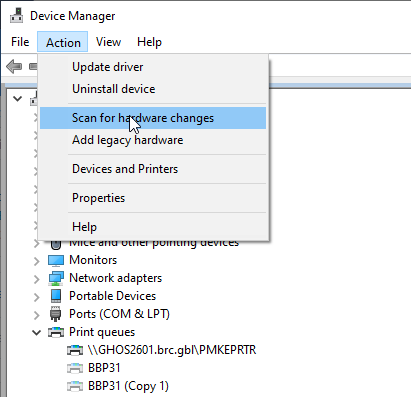
3. Reconnect the printer, scan for hardware changes again.
4. You should see the device list change. Windows PCs will also make an audible noise when a new device is detected.
5. If you do not see any indication that the PC has detected the newly connected device:
- Make sure the device was powered on at the time you connected it to the PC.
- Make sure the USB connector on the printer end is not plugged into the Ethernet port: How to Connect a USB Type B Cable to a Printer.
- Try a different USB cable.
- Try a different USB port.
- Check the USB connection on the printer to see if the on board connector feels loose.
If the above troubleshooting leaves you to suspect the USB port on the printer may be bad, networking the printer can confirm a bad USB port. Consult this knowledge base or the printer user manual to configure networking for your printer.
III. The Network Connection
1. Open the command prompt and ping the printer. In the example below the IP address 172.20.27.118 is used. You should replace this with the IP address configured for your printer.
ping 172.20.27.118 -t
This command will continuously ping the IP address of your printer. If a device with your chosen IP is on your network, you should see this output:
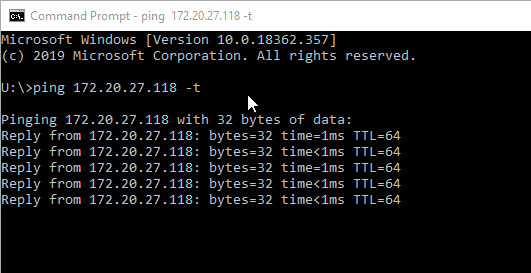
2. With the ping still running, disconnect the ethernet cable from your printer. You should see this output:
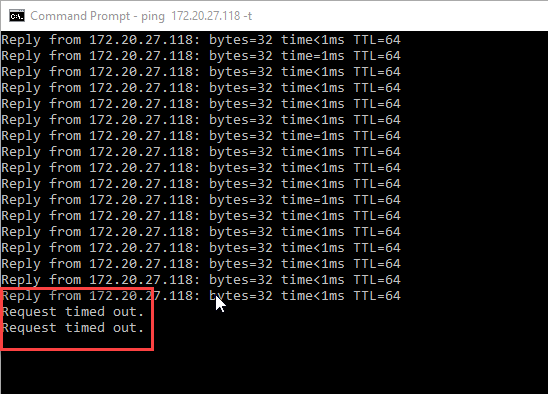
3. If the ping does not time out, then some other device on your network is using this IP address.
If you did not get a ping response:
- The printer has a bad NIC (rare)
- The ethernet cable is bad
- The network port is bad
- Printer network settings have not been configured
- Your printer is on a different subnet
- The IP address of the printer changed (can often happen when using DHCP)
Note: If this is a new printer setup, do not attempt to add devices to your company network unless you are a network administrator for your company. Most corporate networks have implemented security to prevent unapproved devices from being added to the network.
IV. The DriverCheck First:
- Should you have a driver installed? Brady Workstation does not require one for Direct Print models: Brady Workstation - Direct Print Compatibility
- If you require a driver, make sure you have the correct driver installed. Drivers for Brady printers can be found on BradyID.
- Do not connect two printers of the same model to the same PC. This has been known to cause driver conflict and communication issues. If you need to print to the 2 printers of the same model from 1 PC we recommend networking at least one of the printers.
1. Navigate to Devices and Printers to display your installed printer driver.
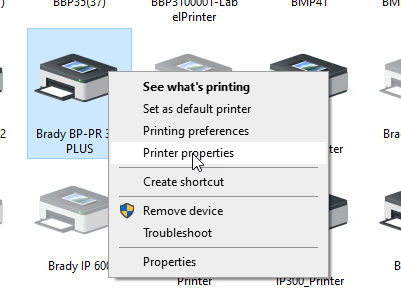
2. Left click the printer, then choose “See what’s printing” at the top.
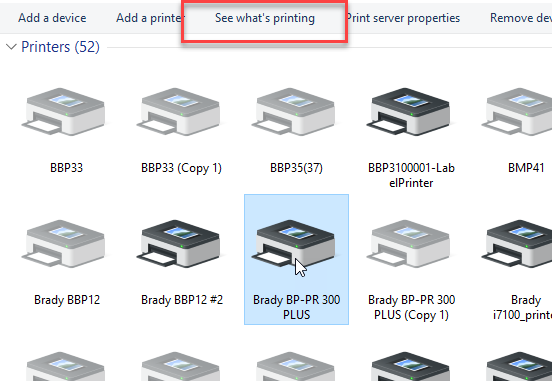
3. With the print queue open and visible, right click the printer and choose “Printer Properties”.
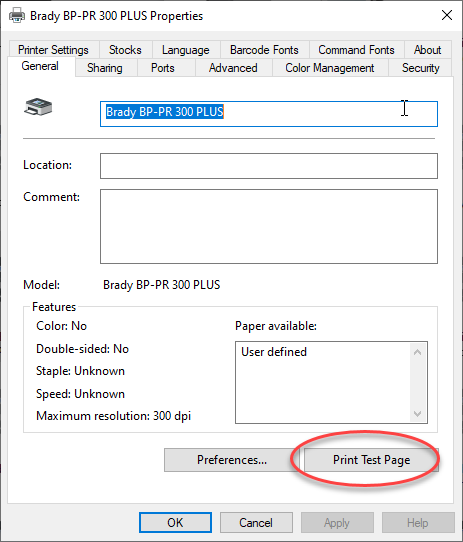
4. Click “Print test page”.
5. Observe the print queue, if successfully sent the job should quickly flash and disappear.
6. If the job is stuck in the print queue then this driver is not configured correctly, the printer is in an error state or his gone into sleep mode.
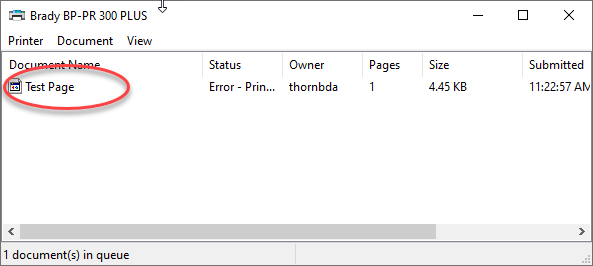
- The driver does not have the correct port configured.
- The printer went into sleep mode.
- The printer is not on.
- There is a driver conflict (two printers share the same driver).
Advanced driver troubleshooting is beyond the scope of this article, however some common workarounds can be found here: Driver Installation, Removal, Configuration and Troubleshooting
If you are able to successfully print a test page from the driver, and text prints on the labels that feed out, then the following must be true:
- The printer and PC are successfully communicating with each other.
- The driver is configured for the correct port.
- The printer is loaded correctly (although not necessarily calibrated).
If you are still unable to print from the software despite successfully printing a test page, then proceed to the software troubleshooting section.
V. The Software
1. Open the print queue, send a print job from the software while observing the print queue.
- If the job flashed and disappeared, this means it was sent to a printer. If the printer you intended to print to did not print, make sure you’re selecting the correct printer in your software.
- If the job gets stuck and errors, this means the driver is not configured to communicate with the printer. See driver troubleshooting above.
- If no job displays at all, then the software is not sending the print job to that printer driver’s print queue.
See: Windows 10 - Cannot print with LabelMark 6 or Brady Workstation
- Antivirus or user account privileges are blocking the software’s ability to communicate with installed printer drivers, contact your IT administrator.
- You are observing the print queue for the incorrect driver, check to confirm the option selected in the software matches the driver print queue you selected. Make sure there are no duplicate drivers.


