J2000 - Label Adjustments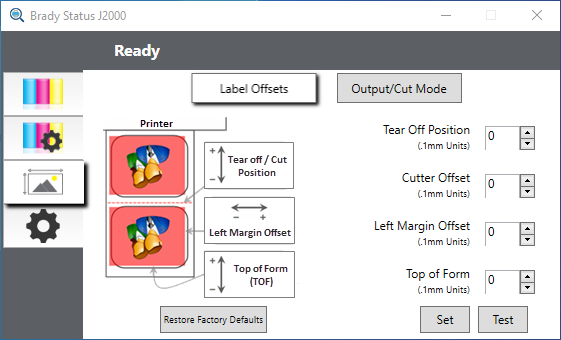 The Alignment Tab (third tab) on the Status Monitor allows you to adjust the vertical and horizontal printing position of the label. If you see white on your label edges use this section to adjust the printing position.If your previous experience with printing is limited to printing letters and cards on 8.5 inch by 11 inch paper you probably are not familiar with an essential part of a label printing - Print Offsets or Alignment. Standard printers feed a sheet and start printing based on the start of the sheet. They also prohibit printing to the edge of the sheet. This is to avoid any need for adjusting offsets. The BradyJet J2000 Color Label Printer, however, senses the beginning of the label with an optical sensor and is capable of printing to top, bottom, left and right edge. Because of this, it is necessary to align the printer to work with specific types of label supply.The BradyJet J2000 Color Label Printer comes factory calibrated to print exactly to the edge of Brady label supply. The printer decides where to start printing by detecting the start of a die-cut label or detecting a through-hole that corresponds to the start of the label. However, due to variations in the left margins and other variables it may be necessary to fine-tune these settings at the beginning of each roll.Before adjusting alignment settings, first print one label at the quality level you intend for the entire job. This will ensure the label supply is moving at the same speed and the supply sensor will sense the gap in the same way.
Three items can be adjusted:Tear off PositionThis value adjusts the position of the last label printed after it has been presented for tear off. This only applies if the output mode is set to "Present the label."
The Alignment Tab (third tab) on the Status Monitor allows you to adjust the vertical and horizontal printing position of the label. If you see white on your label edges use this section to adjust the printing position.If your previous experience with printing is limited to printing letters and cards on 8.5 inch by 11 inch paper you probably are not familiar with an essential part of a label printing - Print Offsets or Alignment. Standard printers feed a sheet and start printing based on the start of the sheet. They also prohibit printing to the edge of the sheet. This is to avoid any need for adjusting offsets. The BradyJet J2000 Color Label Printer, however, senses the beginning of the label with an optical sensor and is capable of printing to top, bottom, left and right edge. Because of this, it is necessary to align the printer to work with specific types of label supply.The BradyJet J2000 Color Label Printer comes factory calibrated to print exactly to the edge of Brady label supply. The printer decides where to start printing by detecting the start of a die-cut label or detecting a through-hole that corresponds to the start of the label. However, due to variations in the left margins and other variables it may be necessary to fine-tune these settings at the beginning of each roll.Before adjusting alignment settings, first print one label at the quality level you intend for the entire job. This will ensure the label supply is moving at the same speed and the supply sensor will sense the gap in the same way.
Three items can be adjusted:Tear off PositionThis value adjusts the position of the last label printed after it has been presented for tear off. This only applies if the output mode is set to "Present the label."
- Add to the current value to move the tear point closer to the printer.
- Subtract from the current value to move the tear point away from the printer.
After adjusting the value click the "set" button to send the value to the printer.
Left Margin Offset
This value moves the printed label left or right.
- Add to the current value to move the printed label to the right.
- Subtract from the current value to move the printed label to the left.
After adjusting the value, click the “set” button to send the value to the printer.
Before adjusting this value make sure the label supply is properly loaded so that there is no gap between the edge of the liner and the fixed throat guide. Any gap at this point will greatly affect the left margin offset value needed to align the label. Also, if you adjust the value with improperly loaded label supply you will have to adjust it again if you load the label supply correctly the next time.Top of Form (TOF)This value moves the print start position up or down on the label. If fine tuning is needed, increase this setting to move the image down on the label or decrease to move the image up on the label. The unit of measure is 0.1mm.
Important: After adjusting the value, click the “set” button to send the value to the printer.
Top of Form is 0
Top of Form - PositiveAdd to the current value to move the printed label down or toward the printer.
Top of Form = 100
Top of Form - NegativeSubtract from the current value to move the printed label up or away from the printer.
Top of Form = -100
Note: You may have to make several adjustments to one or more of these values. After each adjustment, you can click the test button to print a small test pattern on the label. This will help you find the proper alignment value.
Related information

