Clean the A5500
Perform cleaning maintenance after every roll of labels and when prompted by the printer. This keeps the printer running at optimal performance.
Before you begin
Prior to performing any cleaning or maintenance on the BradyPrinter A5500 printer, you must perform the following steps:
- On the touch screen, tap Load Supplies and then tap Load Supply. This shuttles the print mechanism back.
- Power off and unplug the printer.
Warning: You must power off and unplug the BradyPrinter A5500 printer prior to performing any cleaning or Maintenance.
- Open the side door on the printer.
- Remove label supply, making sure to release the label roll to avoid damaging the smart cell.
Note: Remember to reload label material before attempting to print/flag labels.
Click these links to jump to a section:
Cleaning the Flagger Surface
Over time adhesive buildup will occur on the flagger surface.
- On the touch screen, tap Load Supplies and then tap Clear Jam. This shuttles the print mechanism back.
- Power off and unplug the printer.
- Open the front (clear) door on the printer.
- Pull the flagger forward, toward you, to expose the surface.
- Use the cleaning swabs (PCK-6) to clean the flagger surface, making sure the flagger is free of dust, debris, and label adhesive built-up.
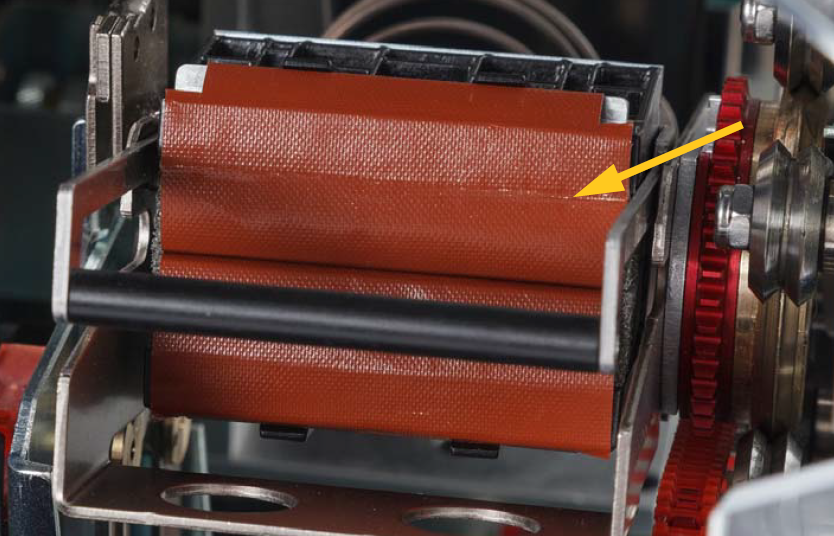
Caution: Failure to remove adhesive build-up will cause labels to jam on the flagger surface.
Cleaning the Print Head
- Open the side door on the printer.
- Use the cleaning swabs (PCK-6) to clean the print head.
- Use another swab (PCK-6) to clean the o-rings.
- Close the side door.
Cleaning the Rollers
Nip rollers are steel with yellow knobs. They add pressure to the drive rollers to keep the label material
from slipping.
Guide rollers are stationary and have a yellow guide ring. They guide the label material through the
printer and help keep the label material taut.
Drive rollers are made of a tacky black rubber. They move the label material through the printer.
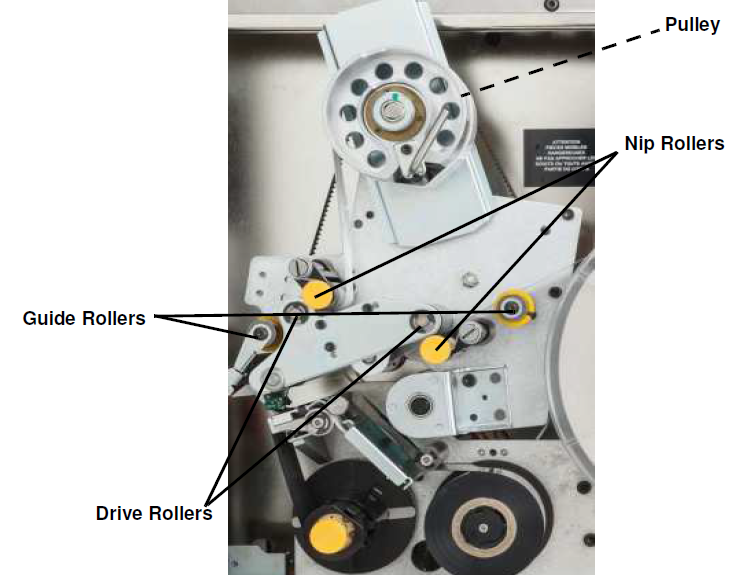
- Open the side door on the printer.
- Using the cleaning swab (PCK-6) to clean the rollers making sure each roller is free of dust, debris and label adhesive.
Note: Drive rollers can be advanced manually for cleaning by turning the large pulley behind the label rewind hub.
Use as many swabs as necessary so that you are always using a fairly clean swab.
- Close the (PCK-6).
Cleaning the Sensors
The flagger contains six sensors that will require occasional cleaning. It is recommended that you clean the sensors every 6 months to a year.
- Open the front and side doors of the printer.
- Locate the notch sensor using the graphic below as your guide.
- Clean the label notch sensor with the cleaning swab (PCK-6).
- Continue to clean the other sensors as needed.
The flagger sensor is located inside the front door to the right of the flagger. You will need to rotate the flagger so that its opening is near the sensor.
The shuttle sensor is located in front of the printer mechanism.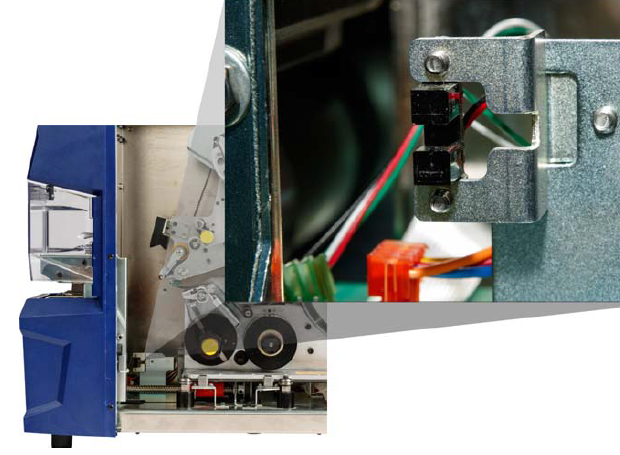
The shuttle limit sensor is located on the back of the printer mechanism. Get to it from the right side.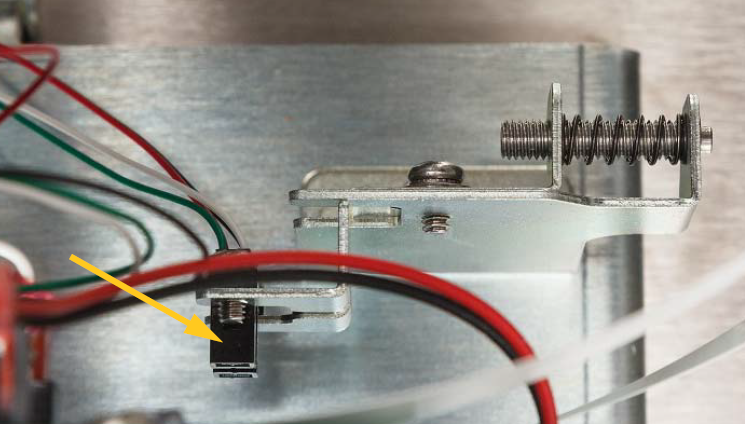
The tilt sensor is located behind the printer mechanism on the upper right-hand side.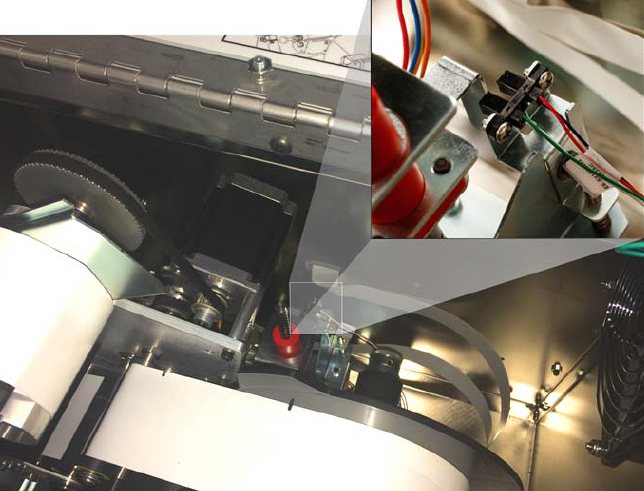
The ribbon out sensor is located behind the ribbon path. The ribbon sensor should rarely, if ever, require cleaning.
Cleaning the Fan Filter
Over time the fan filter will accumulate dust.
- Remove (pull off) the grate from the fan located on the back of the BradyPrinter A5500 printer.
- Remove the filter from the grate.
- Clean the filter by using either of these methods:
- Blow clean air through it.
- Wash it with a mild detergent and allow it to dry.
- Replace the clean filter.
- Snap the grate back into place over the fan. The fan filter is a replacement part that can be ordered on BradyID: WRAPTOR-FILTER.
Related information


