Note: This information can be found on page 19 of the J1000 User Manual: J1000 - User Manual and Quick Start Guide
Cleaning the J1000
Components to clean:
Cleaning the printer can improve print quality and legibility. It also increases output, machine life, printer reliability, and performance.
Cleaning the Touchscreen
- Gently wipe the screen with a clean, lint-free cloth.
- For thicker debris, you can lightly moisten a soft, non-scratching swab with isopropyl alcohol, or use swabs available with the Brady PCK-6 Cleaning Kit.
Cleaning the Printhead and Nozzles
The printhead is built into the ink cartridge.
Tip: As long as the printer is plugged in and turned on, the printer will run a daily cleaning cycle to keep the nozzles clear of clogged ink. If not using the printer for more than two days you may want to remove and cap the ink cartridge. See “Ink Storage Specifications” on page 2.
To save ink and avoid unnecessary cleaning cycles, first test the nozzles to see if they need cleaning.To test the nozzles:
- On the computer connected to the printer, run the Status Monitor software from Start > BradyJet > Brady Status J1000.
- In Status Monitor, select Maintenance and then Clean.
- In Status Monitor on the computer, select Print Nozzle Test.
- Pull the tray forward from under the printer and load it with adapter plates and cards.
- Place a sheet of paper on top of the cards.
- Slide the tray back under the printer until it snaps into place and stops.
IMPORTANT: Printing a nozzle test without a sheet of paper on the tray will result in ink splattered in the tray and base of the printer. Tests printed directly on cards are illegible.
- In Status Monitor, select Print.
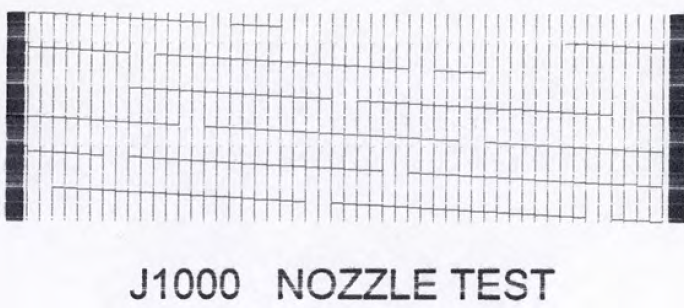
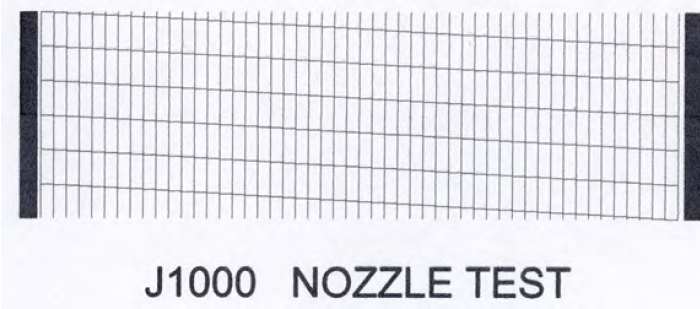
- If the printed grid has missing horizontal lines, clean the printhead. If the top and bottom halves of the vertical lines don’t match up, align the printhead: J1000 Printhead Alignment
Example: Printhead needs cleaning.

Example: Printhead does not need cleaning.
 Example: Dirty Printhead
Example: Clean Printhead
Cleaning the Printhead Nozzles
- In Status Monitor, select Maintenance and then Clean.
- Select either Regular Clean or Heavy Clean depending on the severity of the test result.
- Run regular clean if the nozzle test showed only one or two broken lines.
- Run one or two heavy cleaning cycles if the nozzle test showed many broken lines or fuzzy print.
- Print the nozzle test again to verify that the nozzles are clean. If the nozzles still need cleaning, proceed with the remaining steps.
- Remove the ink cartridge from the printer.
- Lightly moisten a clean, lint-free cloth with isopropyl alcohol. Hold the cloth against the nozzles for three seconds. This wicks some additional ink onto the cloth.
- Gently wipe in one direction.
Note: Depending upon the pressure, there will be two lines of ink that transfer onto the paper towel when you wipe in one direction. This is a sign that the ink cartridge is clean.
- Reinstall the ink cartridge.
- Repeat the first three steps to make sure the nozzles are clean.
Cleaning the Ink Cartridge Contacts
If the metal contacts between the ink cartridge and the printer are dirty, connectivity between the printer and ink cartridge may be interrupted.
To clean the contacts:
- Remove the ink cartridge from the printer. See “Installing the Ink Cartridge” on page 10.
- Lightly moisten a clean, lint-free cloth with isopropyl alcohol and clean the contacts on the cartridge. Be careful not to touch the printhead and nozzles.
- Set the cartridge down with the printhead pointing up.
- Using another clean, lint-free cloth and isopropyl alcohol, clean the contacts in the printer.
- Reinstall the ink cartridge.
- Run a nozzle test to make sure nozzles did not get plugged while cleaning the contacts.
Cleaning Ink From the Bottom of the PrinterAt some point you may find ink directly on the card tray or the base of the printer. This can happen if someone forgets to load cards or move the tray back into position, or if the ink well in the service station becomes full. Clean such spills as soon as possible.To clean ink from the card tray or base of the printer:
- Gently slide the printer forward or backward to access the area that needs cleaning.
- Press down on the latch on the card tray and pull the tray forward, if needed.
- Use isopropyl alcohol on a clean, lint-free cloth to wipe up the spilled ink. Change frequently to a clean section of cloth. You may need to use multiple clean cloths to remove all the ink.
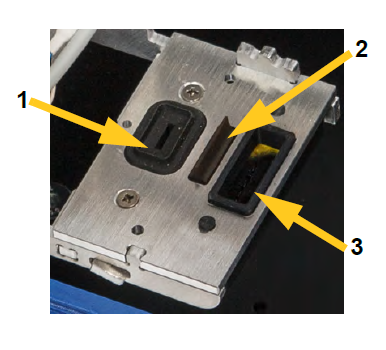
Service Station MaintenanceThe service station (J1000-PAD KIT) is an internal component used to clean the printhead and to cap the ink nozzles when not in use.
1 Cap - When not printing, the printer positions the ink cartridge so that the cap seals the printhead to minimize ink evaporation.
2 Wiper - When running a cleaning cycle, the printer expels ink into the well and then wipes the ink nozzles with the wiper (see Cleaning Ink Nozzles section above).
3. Ink well - The ink well collects ink that is ejected.
 Cleaning the Cap and Wiper
- On the printer touch screen, tap the Maintenance button.
- Tap Service Station.
- The printer moves internal components so that the service station dock is accessible. When it is finished moving, open the cover on top of the printer.
- Lift out the service station, taking care not to spill ink from the well.
- Moisten a clean lint-free cloth with isopropyl alcohol and gently wipe the black rubber cap and wiper clean.
- Place the service station back in its dock as shown below.
- Close the cover on the printer and then tap OK on the touch screen.


