Purchase the printhead on BradyID.
There is no additional programming that is needed if changing the printhead from a 300 DPI to a 600 DPI.
Important: The printhead is fragile and can be damaged. Handle the printhead with care to avoid damage.
Use the T-20 wrench inside of the printer. Open the cover, located the wrench in the base of the frame, turn the wrench clockwise 90° and pull out.
CAUTION! Take the following precautions to avoid damaging the printhead with electrical discharge or mechanical influences.
- Set the printer on a grounded surface. Turn off the power and unplug the printer.
- Ground yourself (with an anti-static wrist strap, for example).
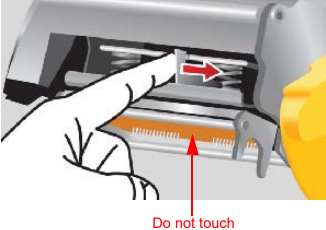
- Do not touch the heating element with hands or hard objects. (The heating element is the dark brown strip called out in the image below.)
- Remove power and supplies from the printer.
- Disengage the printhead locking lever to lift the printhead.
- Move the lever above the printhead to release.
- Carefully disconnect the wires attaching the printhead by grasping the wire connector.
CAUTION! To avoid damage, do not pull on the cable wires.
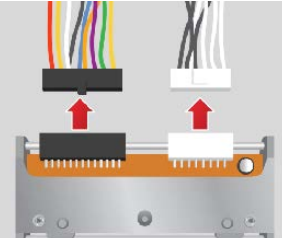
- Insert the cable connectors to the new printhead, taking care to only handle it by holding the metal side brackets.

- Install the new printhead in the printer.
- Replace ribbon and labels, close the locking lever and plug in the printer.

