M710 List (Import Data)The list function enables you to produce multiple labels with variable information from a single, formatted label (main document) and a structured data source.
The data source (or database) is a collection of organized, related data. It is often set up in the form of a table, containing fields (columns) and records (rows). A field is one category of information for each record, while the record is the combination of all the field information for one label.
For example, if you are going to print asset tags, they might include the asset number, serial number, department, and brand. The data for each asset would be in a row and the columns would be for the asset number, serial number, department, and brand.
When the merge is run, the system creates an output label for each record (row) in the data source. The data in each column in placed in a different area on the label. Set up the Data SourceThe data file must be a .csv file in a spreadsheet or database program on a computer and imported to the M710 printer using a USB drive. You can also create the .csv file directly on the printer. If you create the .csv file on the computer, you must import the file to the printer before you can use the List function. Refer to M710 - Import or Export Files for instructions on importing using a USB.
- Press LIST.
- Select Create.
- Enter the number of fields (columns) the data source will contain.
In the example for asset tags, there are four fields: part number, barcode value, division, and company name.
- Select Continue.
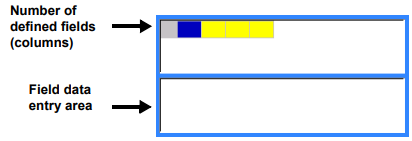
The number of defined fields displays as blue and yellow squares at the top of the screen. The blue field is the current field. The gray square displays the record number as data is entered into the data source.

- Use the navigation keys or double tap to select a field where you want to enter data.
The selected field will turn blue, indicating it is the active field in which the data is being entered.
- Enter the data for that particular field, then press
 .
.
- Once all data for the row is entered, select Next to move to the next row.
- Repeat steps 5 and 6 for each field in which you want to enter data. For information on moving between rows, and on adding and removing rows, refer to page 59 of the User Manual: M710 - User Manual & Quick Start Guide.
- Select Save when finished. The printer offers the following options.
Internal: Save the file on the printer.
External: Save the file to a USB drive inserted in the printer.
Cancel: Cancels saving the file and returns you to the data editor with the data intact.
- To exit the data source, press backspace.

A message displays asking if you want to exit without saving.
- If you have just saved the file, or if you want to start over without saving, tap Yes. The file closes without saving.
- If you have not yet saved the file, tap No. The printer will return to the Save function. See step 9.
Note: If you cannot recall if you saved the file, tap No. Then, if you see the file name in the list of files, select the name (to highlight it) and press Enter. A message indicates the file already exists. Tap Yes to overwrite the file. This will ensure that your file has been saved. You are returned to the editing screen.
- Tap Cancel if you do not want to exist the database.
Working with Rows of DataTo move between the rows of data:
- Select Next to move forward or Prev to move backward through the rows of data.
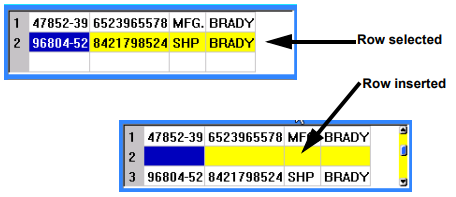
To insert a row between two rows of data:
- Select any field in the row below the row that will be inserted.
- Select Insert.
The row selected moves down and a new, blank row is inserted above it.
To remove a row in the data source:
- Select any field in the row you want to delete.
- Select Delete.
Related information


