Body | Connect to the M710 with Wi-FiImportant: Wi-Fi capability is only available on the wireless printer model. The printer will have the Bluetooth and Wi-Fi symbols above the Print button.
- Turn on the printer.
- Press FN + Setup.
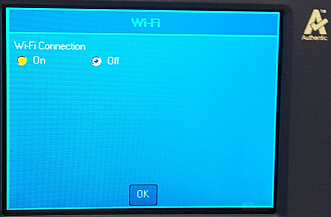
- Tap Wi-Fi on the touchscreen.
- Tap On to turn on Wi-Fi.
The printer searches for Wi-Fi networks and displays a list of networks found. Touch and drag to scroll through the list. If you need to identify the network by static IP address or DHCP, refer to Manually Enter Settings below. 
- Tap the network that you want to use and tap Join.
- Tap Join.
- If the network is a personal network, enter the password on the Join Network screen and tap Next. The printer returns to the Wi-Fi screen which shows the current network.
- If the network is an enterprise network, choose the type of authentication and then tap Next. If the printer asks for either the username or password or for information on the certificate, depending on the authentication method. You may need information from your IT department to complete the settings.
- If the network you need is not in the list, it may not be discoverable. Tap Other. The system displays settings appropriate to your selection. You may need information from your IT department to complete the settings.
- Tap OK once the printer connects to the network.
Manually Enter Settings
- Turn the printer on.
- Press FN + Setup
- Tap Wi-Fi on the touchscreen.
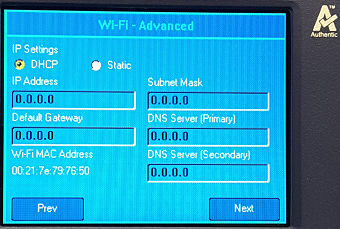
- Tap Advanced.
- Under IP Settings, select one of the following:
- DHCP: DCHP addressing is dynamic and the system uses a DNS server to obtain the printer IP address for you.
- Static: Select static addressing to manually enter the printer's IP address. Fill in the remaining available settings with help from your network administrator.

- Tap Prev.
- Tap Join.
Related information
|
|
|---|


