The name of the label file can be in a barcode on a label that will provide the operator a barcode on a work order.
Set Up the Scanner
Connect the USB scanner to the Wraptor A6200. It is recommended to have the scanner configured for USB.
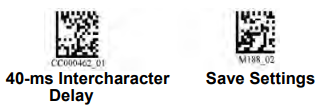
Set up the scanner for at least a 30ms inter-character delay. This will ensure that the printer receives all characters transmitted by the barcode scanner. The following barcodes will set up the Code Reader scanner to use a 40ms inter-character delay:
Add an Enter suffix to the Code Reader scanner. For other scanners, enter the equivalent of a carriage return and line feed in keyboard mode.
Set Up the Label Files and Barcodes
Make sure that the label files to print are all downloaded to the printer, either in printer memory or on a USB drive. Create and provide barcodes to operators.
To put the label files in printer memory:
- Make sure the printer is set to use internal memory (Settings > System Configuration > File Location).
- Use your labeling software to create and send label files to the printer.
To create the barcodes:
- Create a barcode image containing the name of the label. Use any barcode symbology that is supported by your barcode scanner. Create a barcode for each label file.
- Provide the correct barcode to operators. One way to do this is to set up your system to include the appropriate barcode on work orders.
Print from a Barcode
- On the printer’s touch screen, tap Print.
- Scan the print job barcode. If everything is set up correctly, it will open the print job specified by the barcode.
- Insert a wire or cable into the printer jaws to print and wrap as you normally would.

